
Beer Can Chicken Recipe
I remember learning how to run my first cheap offset-smoker cooking whole chickens on a beer can – what we call Beer Can Chicken. Whole chickens are inexpensive; so cooking them makes it easy on the pocket and good for practice. Also the flavor of a whole smoked bird is hard to beat… and these just look cool sitting up on a beer can.
Now I’m not sure who came up with the idea of sitting a chicken on a beer can but I do know that cooking one vertical helps keep the meat moist and tender. The beer doesn’t actually do much for the flavor of the meat, but it does act as good support during the smoking process.
Here’s what you’ll need for this Beer Can Chicken recipe:
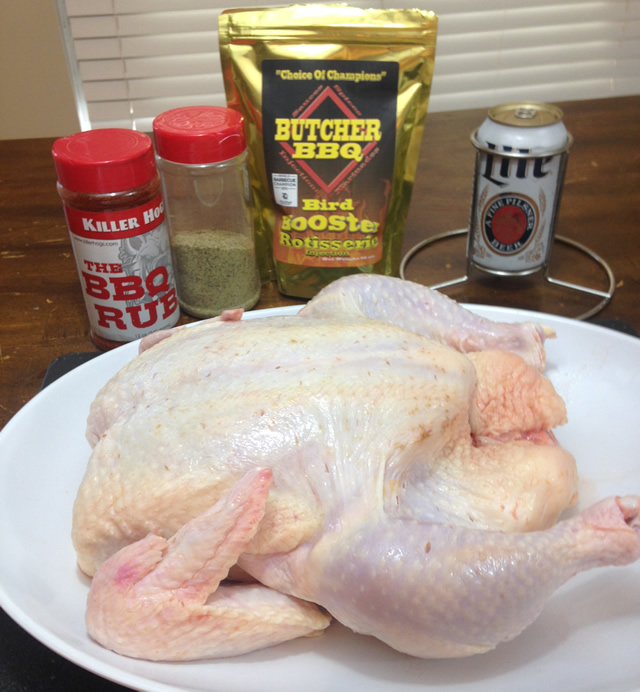
– 1 Whole Chicken (raw of course)
– 1 can of Beer (cheaper the better)
– All Purpose Seasoning *recipe to follow
– Killer Hog’s The BBQ Rub or your favorite bbq seasoning
– Butcher BBQ’s Bird Booster
First you’ll need to remove the chicken from the packaging. It’s best to place it in the sink, so you don’t contaminate anything. Always disinfect any area that comes into contact with raw chicken. Most chickens are packed with giblets so remove these from the cavity. Rinse the bird under cool water and pat dry. Place the whole chicken on a platter for seasoning.
Spray the outside of the skin with a light coating of Vegetable cooking spray and sprinkle All Purpose rub on the outside. You can use any all purpose seasoning that you like but here’s a simple version that’s good on chicken:
Beer Can Chicken All Purpose Rub
– 1 cup Salt
– ½ cup Granulated Garlic
– ¼ cup Black Pepper
– 1 tsp Parsley (dried)
– 1 tsp Oregano (dried)
Mix the ingredients in a bowl and store in an airtight container. This recipe makes enough for several uses.
Add a layer of Killer Hog’s The BBQ Rub to the outside of the chicken. Be sure to sprinkle both AP and BBQ Rub inside of the cavity as well.

I also use an injection to add extra moisture and flavor to the meat. This week I’m using Butcher BBQ’s Bird Booster, but you can use just about anything. The ratio for the bird booster is 2 cups of liquid (directions call for water but I substituted chicken broth) to ¼ cup of bird booster powder. Whisk these ingredients in a bowl and it’s ready to use.
To inject the beer can chicken hit each breast 3 or 4 times just off the breast bone. Move the needle to the lower side of the breast and pump injection down the bottom side. Move down to the legs and stick it a couple times and then go in through each thigh. When it’s all done you will have used about 1 ½ cups of the solution. Discard any remaining injection because the needle has contaminated it.
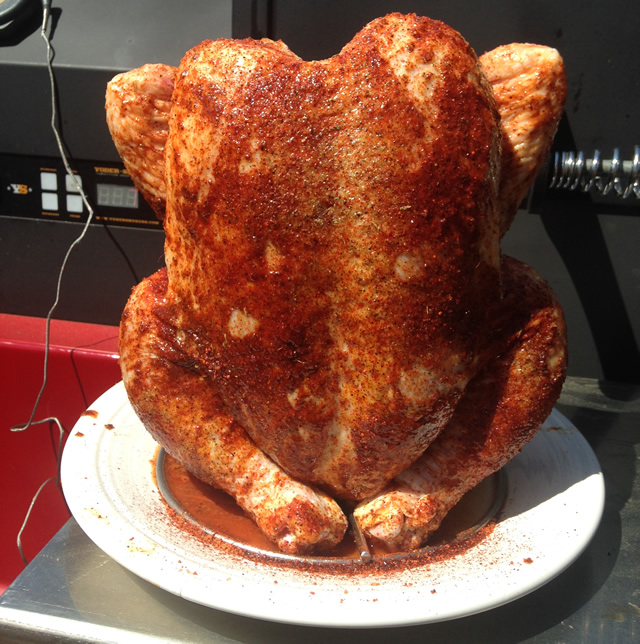
Now the chicken is ready to go on the beer can. You’ll need a 12oz can of beer to hold the chicken. Pour out (or drink) about ¼ of the beer and open up the top a little so steam can escape.
I found a vertical beer can chicken rack that holds a 12oz can perfectly and it gives the chicken a little more support which keeps it from tipping over. It can be a little challenging to balance the chicken on just the can, so you may want to invest in rack. I found the one at Lowes for around $6.
Once the chicken is sitting on the can, it’s ready to go on the smoker. The cooking temperature I use for smoked chicken is 300 degrees. It may sound a little hot, but trust me the skin will turn out perfect at this temperature.
Set your smoker or grill up for indirect cooking and add a couple chunks of fruit wood for flavor. You can use a stronger wood like hickory or pecan if you like, but a little goes a long way with poultry.
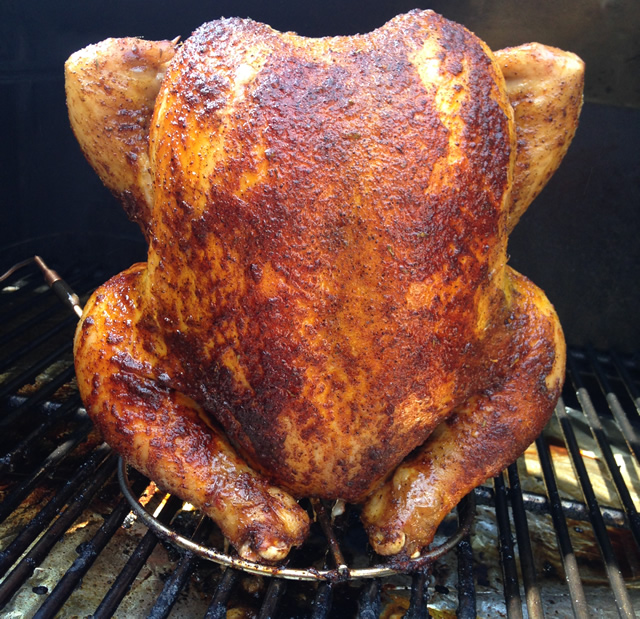
Once the smoker is running at 300 degrees, place the beer can chicken on the pit and close the lid. It will take about 2 hours depending on the size of the chicken.
When it comes to knowing when beer can chicken is done, it’s best to have a decent thermometer. I use a Thermoworks Chef Alarm to monitor the internal temperature, so I don’t have to constantly keep opening the lid of the cooker.
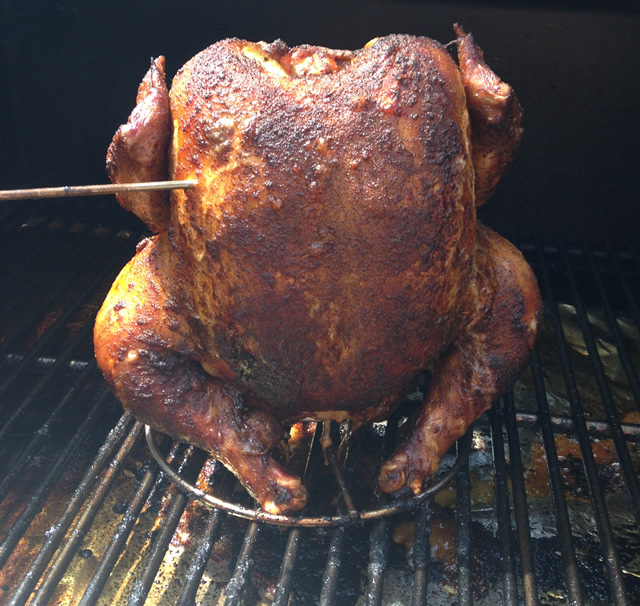
After 1 hour of cooking insert the probe into the thickest part of the thigh and keep an eye on the temperature. Chicken is done when it hits 175 in the thigh and 165 in the breast. You’ll want to be sure to check both areas before removing it from the smoker.
This Beer Can Chicken took 2 hours to reach final temperature and when the thighs were close I moved the probe to the breast just to confirm that it was ready.
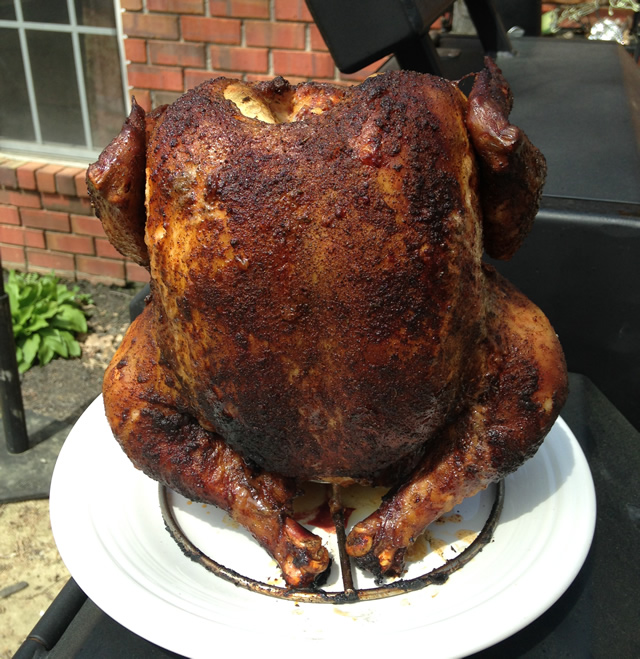
Carefully remove the chicken from the smoker and let it rest for at least 10 minutes before cutting into it. I find it easiest to remove the leg quarters first, then the wings, and finally the breast. It portions the chicken out for serving and is easier to carve this way.
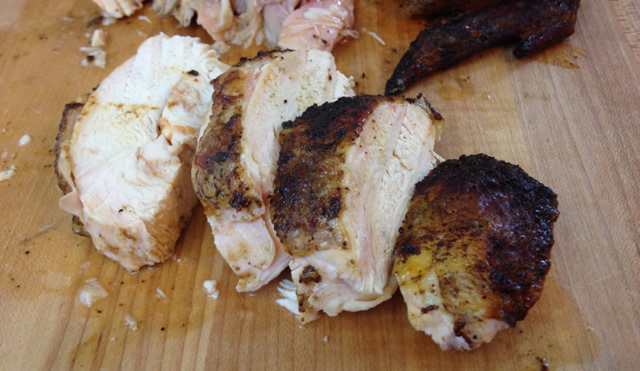
Right away you’ll see that the meat is moist and tender and the skin has a slight crisp texture. I like to cut the breast cross ways and leave a little skin on each slice. You really get the flavor of the grill, the seasonings, and the injection throughout each bite.
Give this Beer Can Chicken recipe a try the next time you’re thinking about smoking whole chickens. You can’t go wrong with it!
Malcom Reed
Connect on Facebook
Follow me on Twitter
Subscribe to my YouTube Channel
Find me on Google+
Follow me on Instagram
Beer Can Chicken
Have a Question About This Recipe?
Connect with us in our HowToBBQRight Facebook group for recipe help, to share your pictures, giveaways, and more!