video, pictures, parts list, and CADD drawings for building your own UDS.
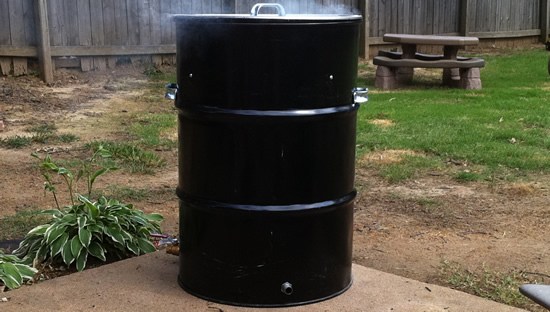
After reading about UDS smokers on just about every BBQ forum there is, I decided to build one myself. I have not ben disappointed. I have owned 5 or more different UDS Smokers and loved every one.
Some of my Ugly Drum Smokers I’ve build myself, some I bought already built and some I used a Kit to build. All have been great smokers.
Big Poppa Smokers has a few different drum kits that make it really easy to build your own UDS – Check it out here >>
Click here for my UDS Plans (CADD Drawing & Parts List) >>
After researching all types of UDS builds, I used Paul’s from the Pickled Pig. I simplified his process a little and even had Waylon create CADD drawings and plans with our new design. But I gotta thank Paul for giving me someplace to start.
1. Find A Drum
You want a unlined, reconditioned, food grade drum w/ head. I found a local place in Memphis called Drumco that had these drums for only $23.I headed right down to the warehouse and had my drum purchased, loaded, and was back at the house in less than 30 minutes.
2. Build Your Fire Basket
The next objective was the fire basket. I have no welding experience so saving a few bucks here wasn’t possible. I considered piecing together some expanded metal with wire clamps and an 18” weber replacement fire grate, but I really liked the design Paul used.
I found someone who could fabricate the fire basket an gave him the CADD Drawings.
Click here for my UDS Plans (CADD Drawing & Parts List) >>
Getting someone to build my fire basket cost $100. After 2 days, I got the phone call that it was ready.
3. Buy The Hardware and Supplies
Now that I had the two critical pieces (Drum & Fire Basket), I was ready to purchase the hardware necessary to put the thing together. These parts were really easy to find and came from my local Home Depot or Tractor Supply.
Click here for my UDS Parts List & Plans >>
4. Assemble Your UDS Drum Smoker
Once I had everything purchased, it was time to assemble the UDS. I had Waylon help me with this part.
Click here for my UDS Plans (CADD Drawing & Parts List) >>
We measured and marked the drum first, and then drilled the holes.
- For the bottom intake holes we used a 1” hole saw bit for the drill. I wanted the holes evenly spaced, so with a little Geometry it worked out to be about 24” spacing. The holes were cut in 2” from the bottom of the drum. It wasn’t that difficult to cut the holes, but I do recommend taking it slow at first. Remember that any hole you make in the drum is suspect to leak, so read the instructions, measure twice, and go slow.
- After drilling the intake holes we switched bits and drilled the holes for the grate bolts. These are spaced out evenly as well… basically one every 90 degrees around the drum.
- The drum I bought didn’t have a bung hole in the lid, so I had to create a hole for the exhaust as well. I used a 2” hole saw bit for this. To cover the hole I use a piece of strip magnet. I wasn’t sure that it would work, but after a few cooks it’s holding up just fine. I’ve found that I don’t use it much during cooking but it helps when putting out the coals after a cook.
- Next we installed the handles on the side of the drum. You’ll want to imagine carrying the drum and put them in a location that’s easiest for you to grab them. For my UDS I placed them just below rack level.
Now that all of the holes were drilled it was time to install the hardware.
- We placed the 1 conduit washer on each 3/4” pipe nipple and started it through the intake holes at the bottom of the drum. It was a snug fit but with a little light tapping with a hammer we had the fit I wanted.
- Once all the nipples were in place, we placed the washers and other conduit nuts on the nipples. Two of the black pipe nipples get caps and on the other we attached the 3/4” brass ball valve.
- The rest of the build is downhill. Insert the bolts and nuts for the grill grate, and it’s practically done.
- I almost forgot to scrap the gasket from the underside of the lid, but this only took a few minutes. A flat head screwdriver scrapped under the edge of the gasket will do the trick.
- I didn’t install a thermometer yet, but I plan to in the near future. For now, the plan is to attach the pit probe from an old BBQ Guru straight to the grill grate.
5. Season Your UDS Drum Smoker
To season the UDS, I rubbed the inside down with vegetable oil, placed 12lbs of charcoal briquettes in the fire basket, and several chunks of hickory on top the coals.
I used a Propane Weed Burner to light the basket in 4 different places and opened the intakes 100%.
The lid was off for the first couple of hours. I wanted to make sure that everything heated up and burnt-off anything on the inside.I let the smoker roll for about 5 hours.
Next, all that was left was to start smoking…
Recipes Using The UDS Smoker
Smoked Porterhouse Steak with Bacon Tallow Butter
May 18, 2022Mississippi Pork Roast
February 12, 2022Hanging Tomahawk Ribeye
April 16, 2021Smoked Picanha
March 9, 2021My Latest Recipes
Have a Question About This Recipe?
Connect with us in our HowToBBQRight Facebook group for recipe help, to share your pictures, giveaways, and more!

Where n how can I purchase your bar b q sauce , rib n glaze for rib? From Howtobbqright
https://h2qshop.com/
Hi Malcom,
I noticed on your Gateway Drum Smoker you have a hinge for the cover. How do you like having this and where can this be purchased from? Also would the drum need to have probe ports drilled into the side so the wires don’t get pinched over time?
How would you rate the Gateway Drum and Pit Barrel Cooker?
They are both great. All comes down to what you like to use and how you like to cook. Check out AmazingRibs smoker review https://amazingribs.com/ratings-reviews/grill-and-smoker-reviews
trust me when i say a pit barrel is the easier way to cook and your bbq will come out fantastic. ive owned several kinds of cookers and i can say i love drum smoking the best.
Hey Malcom,
Have you had any rust on the inside after seasoning? Im guessing the inside is bare steel?
Thanks
I had a friend that went to the dump and found a used drum and converted it into a smoker. When I asked him if he knew what material was in the drum before he converted it, he said, “Hum, that’s a good question!” I’d caution anyone using an old drum for smoking unless you knew what purpose the drum served…who knows what poisonous substance could have been in the drum!
What are your thoughts on Oklahoma Joe’s Bronco drum? Also are the thermometers that come with the drum accurate? If not could I just stick a dot thermometer inside (but not in the meat) and leave the wire outside (the thing that says the temperature) would that work to be able to read the temperature accurately if the one that comes with the drum is not accurate?
That’s why you get a food grade barrel that’s either not used, or used for food items.
Hello Malcom,
Gonna buy an assembly kit from Big Poppa Smokers, can’t wait! All I wanted to know was, can you grill on a UDS? I’m sorry if that’s a silly question, I’m a complete novice, do you just take the lid off and let the temps soar? I imagine the grate is quite high off the charcoal that’s all.
Thank you!
Declan
why can’t I see the CADD drawings and parts list to build my own UDS? Keeps coming up not found.
Enjoy you recipes and products.
Thank you
I can’t open the cadd plans of the drum smoker..